
Fish University 310: Rigging All-Purpose Lures
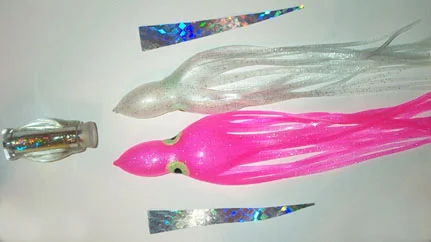
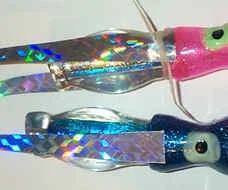
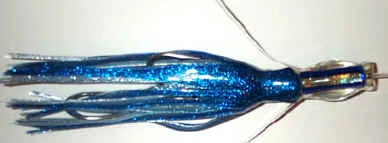
Whether you are coming to Hawaii for the first time or have fished here for years, the one constant in fishing you’ll learn immediately is there is no such thing as a constant. Anglers all have their own ways of doing things, and rigging a lure is no exception. This article will help explain some of the basics of rigging a lure for general fishing in Hawaiian waters. We’ll show a 9” all purpose lure in the figures that follow.
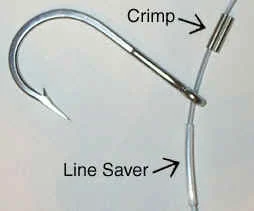
I like to use 400-pound, 2.0 millimeter (give or take a thousandth) leader for my all-purpose trolling lures. It’s strong enough to handle most anything you could hang onto, large enough diameter to not cut the leaderman’s hands to shreds, yet narrow enough to fit in the crimps and line saver inside the lure head. It also seems to have the right amount of stretch, and feels good in the hands when you are working with it.
Ingredients:
One or more lure head(s) you like the look of. Experience may tell you to try one, while your buddy may tell you to use something else. Whatever you like, go with it and experiment. Lighter colors in the Spring and darker in the Fall is the general rule of thumb, but have enough shades/tones to cover your bases.
A few hundred feet of leader as described above. If you plan to fish IGFA rules, you have 30 feet for a double line and 30 feet for the leader to work with, but the total for the two can’t go over 40 feet. So something has to give a bit. I usually run my leaders at 20-24 feet, and run the doubles at 15 feet (including the swivel). This way, if I switch out a lure for another in the heat of battle, I do not run the risk of exceeding the 40-foot limit by replacing a short leader with a long one.
Two or three skirts that generally match the color scheme of the lure head. While it is OK to put a dark blue skirt on a purple lure head, try to stay away from bright red on deep purple. Triple skirted lures create more drag and reduce the action of the lure, but on a heavy lure that you want to run straighter, they are effective.
Foil or Mylar material for wings (yes, you can use Lai skin, but if you know how to do that, you don’t need to be reading this!!). Two-sided sticky foil is the most common, but now the Mylar material is increasing in popularity because of its translucent properties that more resemble flying fish wings.
Wax string resembling heavy duty dental floss. Actually, waxed dental floss will work too. The wax helps keep the line tight, helps grip the skirts and wings, reducing slip-off considerably.
Surgical hose, in black, with a 3/16 to 5/16” inside diameter. Get a couple feet of it and chop into 1 inch lengths. You’ll then use it for everything from hook end protectors to keeping the tandem hook rig secure.
Crimps that match the leader size EXACTLY. Don’t risk losing a big fish from getting a crimp that’s too big for the leader and over-compensating by going for the crimp super squish. This is not how it is engineered, and this will fail sooner rather than later. Remember that line and leader only fail under load, and the only time anglers ever have a leader under load is when there’s a big fish on the line. That is not the time to be testing your equipment.
Line saver, which is a hollow, straw-like plastic tube material slightly larger than the diameter of the line. This stuff can’t be overlooked in it’s anti-chafe properties and resistance to destruction from Ono (wahoo) teeth. Your leaders will last 3 to 10 times longer using this 50 cent-a-mile material.
Hooks. For the lure in this session of fish university, a 10/0 closed shank leading hook and a 9/0 open shank trailer is used. Why this combination? A few reasons. First, a smaller hook on the trailer will generally stay inside the skirt in a swimming lure better than a bigger one, causing less fouling. Second, two different types of hooks gives you two different chances on a hookup for a fish that doesn’t outright nail the lure, as the hooks penetrate differently and also carry the load differently. Third, that’s how I was originally shown and have yet to question it.
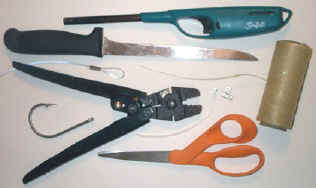
Tools:
Scissors, a knife, a crimping tool that matches your crimps (don’t use a pair of vise-grips for crying out loud!), dish soap, water, paper towels, regular towels (don’t use the bath towels unless you have no fear of spousal repercussion) and a nice big table in front of the TV. It always helps if your spouse is visiting relatives in another city for the table in front of the TV part, and then you could probably even get away with using the bath towels.
The Assembly:
Start with the skirts and wings. For no other reason than safety, it’s much easier to manage the skirts, the head, the wings, etc. without the worry of stabbing yourself with a couple of large hooks. Lay the head and the skirts down on the table, place the skirts just above the head, and decide the best area to cut the skirt head so the diameter closely matches the diameter of the skirt rings. Also take note of the eye position, and if the lure has “sides” keep the eyes on the sides.

Cut the skirt heads, and slide the inner skirt onto the lower skirt ring of the lure head. You can usually do this one without any soap. As you slide the skirt up, make a constructor knot (see description and diagram shown at bottom of page if you don't know how to tie this knot), slide the knot over the skirt, cinch down, and finish the knot with an overhand hitch. The finished knot looks like a regular square knot, but the added twist under the loop of the constructor knot helps to keep it all cinched down and solid.
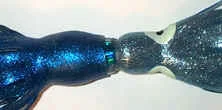
OK, that’s the easy skirt done. Flip the outer skirt inside out, get away from the TV for a moment, and go over to the sink. Apply some dish soap to the outer side (now it’s inner because you flipped it inside out) of the skirt, and slide it onto the head starting at the leading edge of head, over the contours of the lure, and hold the edge of the skirt at the base of the upper skirt ring.
At this point, you’ll have one skirt on properly (hopefully) and one inside out and completely covering the lure head. The skirt tails will be pointing in opposite directions. Don’t forget the eyes!! Whichever way you laid the eyes on the inners skirt should be how you lay them on the outer one.
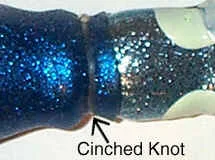
Make another constructor knot, slip it over either skirt, run the knot to the upper skirt ring and cinch down, closing it off with an overhand hitch. If your lure is a single skirt ring, tie the knot on the other side of the inner skirt. Also, try to tie the knot away from the eyes (i.e. top or bottom of the lure) so when the wings get tied on there isn’t a bulge from 3 knots.
Now flip the skirt back so it is right side out, and you should see nothing but a smooth transition from the head to the skirts which now dangle like the skirt of the hula girl you are pretending to not watch on TV.
Before pressing on, thoroughly rinse the lure and skirts under the tap to get rid of the soap.
Next up, add the wings:
Most wings are cut in a long, narrow triangular shape, but some add a little flare at the bottom for good measure. However you’d like to finish them, the leading end should run about 3/8” to ½” wide, tapering down to a point or double point. Wings can be from about 5 to 7 inches long. Pre-tie a wide, looping constructor knot and slip it down the lure head. Then, take the two wings and hold them against the lure head with just the last 1/8” exposed past the joint between the skirt and lure head. The wings should line up over the eyes on the skirts and the tailing ends (yes, the pointy ends) should be pointing forward toward the leading edge (or boat end) of the lure. Slowly cinch the knot down over the wings, and move the knot to one side or another under one wing.
When the knot is almost tight, you should be able to let the wings go and pull hard on the wax line. It will suck the wings and the line right into the cavity right at the skirt/head joint, and will hold the wings firmly in place. Now, simply bend the wings back to the trailing edge, and you have a lure ready for the hooks.
Preparing the Leader:
Set the lure head down just above your working area, and lay out where the hooks will go. Now it’s time to see about keeping the hooks from penetrating your palms. If you are fishing IGFA rules, you have to keep the hooks inside the skirts and the eye of the trailer can’t overlap the shank of the leader hook. No idea why this is the rule, it just is.
Once you have the layout, start by cutting the line-saver. This will be your length gauge for setting the hook pattern. You’ll need 5 pieces of line saver, the lengths as follows:
1 piece at about 4 inches (approximately, depends on the length of the lure head) for inside the copper lure head tube,
2 pieces at about 1 ¼” long, for the trailing hook assembly
2 pieces at about 1 ½” long, one for the spacing between hooks and the other to create a loop for the lead hook and the trailing hook assembly
Start by taking a piece of leader that is manageable, say 2 or 3 feet. Feed one end through a crimp, one piece of 1 ¼” line-saver, through the 9/0 hook, and back through the crimp. Pull the leader back to form the loop, crimp the loop side first, then crimp the other side. Trim the bitter end. Some people like to burnish the bitter end to make a ball that cannot slip through. My feeling is if you have the proper crimping tool and the right size crimp for the line, this is unnecessary.
You should now have a hook looped onto your leader with linesaver and a crimp holding it all together.
Now, take a piece of the 1 ½” long line saver and slide it down the above mentioned leader to the crimp. Feed another crimp onto the leader, then the other piece of 1 ¼” line saver. Feed the end of the leader back through the crimp, making another loop, pull snug, and crimp off, again crimping the loop end first and the other end second. Trim the bitter end again and burnish if you wish. This completes the trailing hook assembly.
Using 9/0 and 10/0 hooks usually works pretty good with a piece of 1 ½” long line saver as the spacer, but you may need to experiment with the sizes and see what works for you.
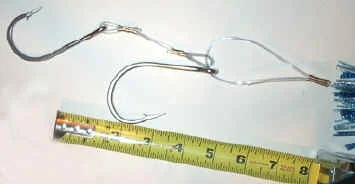
Next, take your piece of 20-24 foot leader, slide on a crimp, the other piece of 1 ½” long line saver, go through the leading hook and the loop of the trailer hook assembly, then back through the crimp. Cinch down snug and crimp, yes, loop side first. Make sure before you crimp it that you check the way the hooks will lay. The hooks can either be at a 90 degree to each other or 180 degrees (i.e. back to back), but do not leave the hooks facing the same direction.
Trim the bitter end and burnish if you like.
Next take the longest piece of line saver and hold one end over a match for a second, flaring it just a bit. Feed the other end through the lure head and pull so the flare rests at the back of the head. Feed the leader through the line saver until the crimp of the leading hook rests up against the back of the lure head, making sure the skirts don’t get tangled along the way. Run a crimp loop at the other end that can be connected to the swivel, and this candle is lit. You are ready to fish in Hawaii for big game.
Optionals:
There’s a couple more optional things you can do to make the lure run like you want it to. First, you can use a piece of black surgical hose, tape, or wire ties to clamp the lead hook to the trailer hook assembly, thus ensuring the angle of the two hooks will remain constant. You could also run a few half-hitches around the leader above the lead crimp to give the lure head some shock absorption.
You can also wrap some electrical tape around the leading edge of the hooks so the rig fits snugly into the back of the lure head. Some say this technique will keep the hooks at the angle most conducive for high hook up ratios.
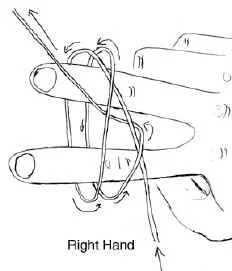
The Constructor Knot:
Hold your weaker hand out, palm down, thumb toward you, and split your first two fingers like a peace sign. Take 5-10 inches of the wax line, and drape over your index finger, then over the middle finger. Go down, come back to the index finger, back to the middle finger so you have 2 loops that are about an inch and a half in diameter. Take the line and go under the two loops. It should look like a regular half-hitch with an extra loop.
Be careful as you pull it tight…..it’ll have a tendency to hang up on itself until it gets tight, which is a good thing, but it makes the tightening of the wings a little tricky.